
Introduction
Every great game has a good backend at it’s core. PlayFab provides an elegant yet powerful solution. The intent of this page is to document my progress in learning to use it and to provide direction for it’s implementation.
This document is a work in progress.
What is PlayFab backend?
PlayFab is a service provided by Microsoft to help developers implement cross-platform multiplayer functionality to video games such as:
- Analytics – “Gather and view title statistics”
- User Authentication – “Login through various platforms”
- Title Specific Data Storage – “Inventory, purchases, profile information, friends list”
- Party / Group – “Friend grouping”
- Chat / VoIP – “Communications”
- Matchmaking / Lobby – “Multiplayer queues”
- Virtual Machine Game Servers – “Dynamic game server hosting”
PlayFab saves time and puts functionality in the hand of the developer.
Resources
- Official PlayFab Discord – This discord is a must.
- Editor Extension – Used to install PlayFab SDK as well as configure it.
- Unity SDK – PlayFab SDK without the editor extensions.
- PlayFab Unity Party SDK – Group and chat functionality
- PlayFab Multiplayer SDK – Lobby and Matchmaking
- GSDK – Game Server SDK
- MpsAgent – An executable that mimics PlayFab Multiplayer Servers (MPS) operations to aid in local debugging.
- Mirror – Networking solution

Content
- Setup
- Login
- Party/Network/Chat
- Friends List
- Multiplayer
- Matchmaking
*Indented listings are still being researched*
Setup
PlayFab has a very detailed article about the subject which can be accessed here:
Login
Once the SDK/Editor Extensions have installed , the first step is to setup some form of login behaviour to the PlayFab service as every subsequent part of PlayFab requires the user to be logged in.
There are multiple ways of authenticating the user to the service. The first ones shown in the documentation is to login with one of the anonymous login mechanisms. These include CustomID, Android and IOS. Since these are essentially identical, their respective documentation will be linked at the bottom of this section.
Login with CustomID Example
using PlayFab;
using PlayFab.ClientModels;

private void Start()
{
    LoginWithCustomID();
}

private void LoginWithCustomID()
{
    var request = new LoginWithCustomIDRequest {
     CustomId = SystemInfo.deviceUniqueIdentifier,
     CreateAccount = true,
     InfoRequestParameters = new GetPlayerCombinedInfoRequestParams
     {
       GetPlayerProfile = true
     }
};

  PlayFabClientAPI.LoginWithCustomID(request, OnLoginSuccess, OnLoginFailure);
}

private void OnLoginSuccess(LoginResult result)
{
     Debug.Log("Successful login");
}

private void OnLoginFailure(PlayFabError error)
{
     Debug.Log("Login attempt has failed");
     Debug.Log(error.GenerateErrorReport());
}
PlayFab works by sending requests and gathering results. We use these to transmit and receive data from their API. Here we intend to authenticate a user, we “request” access. In “LoginWithCustomID()”, we create a variable to hold said request. Since there are multiple choices of requests and for simplicity, we use the var keyword and name it “request”. See line 11 in example above.
We then instantiate the request using the desired type, in our case a “LoginWithCustomIDRequest“. PlayFab provides us with multiple different way’s to authenticate our users. For example, we can authenticate using Steam, Facebook, Google, Android and many more.
In our newly created request variable, we are able to input data to be relayed to the PlayFab API. At a minimum, the request will require a CustomId of sorts which, in our example, is “SystemInfo.deviceUniqueIdentifier“. However, if our user does not already have an account with the title, it will return an error. To avoid this, we add “CreateAccount = true” to the request. This will ensure that our users create an account with the “CustomId” if none can be found.
Lastly, when authenticating our users, we will most likely want to return some information about them to use in our game such as the display Name, friends list, title specific data and so on, all of which is provided and stored by the PlayFab Service. This can be accessed within the authentication request by using “InfoRequestParameters“. Since this is a new request in itself, we need to instantiate it using the keyword “new GetPlayerCombinedInfoRequestParams“. Through this request, we can gather the users profile, statistics, inventory and so on. In our example, we want to access the player’s display name which leads us to “GetPlayerProfile” that we will set to true. See line 16 of the above example.
SystemInfo.deviceUniqueIdentifier Side Note
SystemInfo.deviceUniqueIdentifier shouldn’t be used if testing multiple clients on the same machine. While we may be able to login multiple clients under the same ID, when we attempt to implement chat and networking (Party), a bunch of errors will be generated that do not directly point to your login as a problem. While it may seem obvious, it’s an easy mistake to make. To avoid this issue during testing, I recommend using a member variable of type string exposed to the editor to set your CustomID.
[field: SerializedField, ToolTip("Custom ID used to login to PlayFab for testing")]
public string PlayFabCustomID { get; private set; } = default;
We now have a request ready to be used to authenticate our user. To do this, we call up the client API using “PlayFabClientApi.*”. In our example, we follow this statement with the method “LoginWithCustomID( )” and pass along our data. This method takes in our request variable and has two callbacks that need to be implemented to deal with success or failure.
The first is success. This method must have a parameter of type “LoginResult“. This parameter will contain all the information we should need for our user. The other will be used for failures and takes a “PlayFabError” parameter.
The “LoginResult” parameter provides us quite a bit of information about our user which we can then use for our game such as the player’s profile or Entity ID / Entity Type.
* Entity ID is the ID used by PlayFab to reference the user in it’s database.
** Entity Type – Not 100% sure what this is for just yet. TBD
*** Entity Token Response
Note: CustomID, Android and IOS all can be authenticated without further steps using “SystemInfo.deviceUniqueIdentifier“. All other way’s of authentication require development accounts with the respective providers and possibly other SDK’s. More on this later.
Get Display Name Example
void OnLoginSuccess(LoginResult result)
{
    Debug.Log("Successful login/account creation.");

    if(result.InfoResultPayload.PlayerProfile.DisplayName != null)
    {
        DisplayName = result.InfoResultPayload.PlayerProfile.DisplayName;
    }
}

private void UpdateDisplayName(string displayName)
{
    var request = new UpdateUserTitleDisplayNameRequest
    {
         DisplayName = displayName
    };
    PlayFabClientAPI.UpdateUserTitleDisplayName(request, OnDisplayNameUpdate, OnDisplayNameUpdateError);
}

private void OnDisplayNameUpdate(UpdateUserTitleDisplayNameResult result)
{
   Debug.Log("Updated Display Name");
   DisplayName = result.DisplayName;
}

private void OnDisplayNameUpdateError(PlayFabError error)
{
   Debug.LogError("Could not update Display Name");
}
In this example, we use the “LoginResult” parameter of the method OnLoginSuccess to find out if the user has an assigned display name. If that is the case, it’s value is stored in a member variable, otherwise we would tell the service to assign one (“Player #?”) through a client API request (“UpdateUserTitleDisplayNameRequest“) of type “UpdateUserTitleDisplayName“. See method UpdateDisplayName above on line 11.
Just like our login request, we need a success and failure method. We can use the success method to update our UI or in the case of a multiplayer game, to call an event which would update this data on other player’s clients as well.
Extra resources
Third party API options
PlayFab authentication using Facebook
PlayFab authentication using Google Play
PlayFab authentication using Kongregate
PlayFab authentication using Steam
Playfab authentication
Anonymous authentication
PlayFab authentication using CustomID
PlayFab authentication using Android
PlayFab authentication using IOS
Further reading
Back to Top
Party/Network/Chat
PlayFab describes this feature as Game Networking / VoIP and Chat. With this SDK, we can create “Networks” and our users can join. The user only needs a network ID and they are able to join a network. We can then send data over the network.
Intended use case
Pre, Post and in game chat/VoIP. More info to come.
Important Side Note
Normally, the user should be able to join any number of networks but the Unity Party SDK was coded to automatically disconnect from a network when attempting to join another. It is possible to change this by modifying the file “PlayFabMultiplayerManager.cs” ourselves although we would need to apply this change each time the SDK gets updated.
// See line 1005 of PlayFabMultiplayerManager.cs
// If we are already in a network, leave the network
if (_playFabMultiplayerManagerState >= _InternalPlayFabMultiplayerManagerState.ConnectedToNetwork)
{
       _LogInfo("PlayFabMultiplayerManager:JoinNetworkImplStart:QueuedCompleteJoinAfterLeaveNetworkOp");

       _queuedCompleteJoinAfterLeaveNetworkOp = new QueuedCompleteJoinAfterLeaveNetworkOp()
       {
              queued = true,
              networkId = networkId
       };
       LeaveNetworkImpl(false);
}
else
{
       JoinNetworkImplComplete(networkId);
}
PlayFab Party SDK Quickstart Documentation
Before we get started, visit your Title Overview at PlayFab.com. Click on the multiplayer tab on the left and then the party tab up top. Make sure it’s enabled.
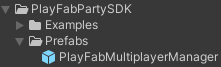
After installing the SDK, navigate to the prefabs folder and drag the multiplayer manager into your scene.
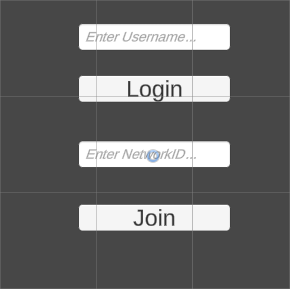
User Interface Example
At this point, we are starting to need some UI elements to add functionality. Start by making a canvas. Set it to scale with screen size in the Canvas Scaler component in order to prevent UI glitches if you are in Free Aspect in Unity’s game window.
Since the intended functionality at the moment is for two players to be able to interact using a string, we create two input fields and two buttons. One will be used to login using a string and the other will be used to input a friends network id.
Back to code
using System.Text;
using UnityEngine;
using UnityEngine.UI;
using PlayFab;
using PlayFab.Party;
using PlayFab.ClientModels;
using TMPro;

void Start()
{
    UI_LoginInputField.text = SystemInfo.deviceUniqueIdentifier;
}

private void Update()
{
    if (Input.GetKeyDown(KeyCode.Return))
    {
        SendChatMessage();
    }
}
As with any script, we begin by adding namespaces we will need and some member variables to hold some data.
- PlayFab.Party;
- System.Text; – Used to access Encoding namespace which is in turn used to send data over to the PlayFab service. More on that later.
- UnityEngine.UI; – Optional.
- TMPro; Optional.
Member Variable Example
// PlayFab
[field: SerializeField, Tooltip("String value of our current NetworkID")]
public string NetworkID { get; private set; } = default;

[field: SerializeField, Tooltip("Display Name of Player")]
public string DisplayName { get; private set; } = default;

// Unity UI
[field: SerializeField, Tooltip("Reference to the Input Field UI Element."), Header("Unity UI")]
public TMP_InputField UI_NetworkInputField { get; private set; } = default;

[field: SerializeField, Tooltip("Custom Login ID for testing.")]
public TMP_InputField UI_LoginInputField { get; private set; } = default;

[field: SerializeField, Tooltip("Chat Input Field reference.")]
public TMP_InputField UI_ChatInputField { get; private set; } = default;

[field: SerializeField, Tooltip("Chat Box Reference.")]
public TMP_Text UI_ChatBox { get; private set; } = default;

[field: SerializeField, Tooltip("Chat Submit Button Reference.")]
public Button UI_ChatSubmitButton { get; private set; } = default;
The public string NetworkID is what we will transmit to other user’s clients to initiate chat and other functionality.
Make sure to drag your UI elements onto your fields.
Scroll down to your OnLoginSuccess method. Whenever this method gets called, we know that we are authenticated to the PlayFab service.
void OnLoginSuccess(LoginResult result)
{
    Debug.Log("Successful login/account creation.");

    if(result.InfoResultPayload.PlayerProfile.DisplayName != null)
    {
        DisplayName = result.InfoResultPayload.PlayerProfile.DisplayName;
    }

    PlayFabMultiplayerManager.Get().CreateAndJoinNetwork();
    PlayFabMultiplayerManager.Get().OnNetworkJoined += OnNetworkJoined;
    PlayFabMultiplayerManager.Get().OnRemotePlayerJoined += OnRemotePlayerJoined;
    PlayFabMultiplayerManager.Get().OnRemotePlayerLeft += OnRemotePlayerLeft;
    PlayFabMultiplayerManager.Get().OnDataMessageReceived += OnDataMessageReceived;
    PlayFabMultiplayerManager.Get().OnChatMessageReceived += OnChatMessageReceived;
}

public void JoinNetwork()
{
    PlayFabMultiplayerManager.Get().JoinNetwork(UI_NetworkInputField.text);
}
The Party SDK comes preloaded with a bunch of events which are available through it’s singleton (“PlayFabMultiplayerManager” in example above). It’s important to make sure we are authenticated before making calls or we will return errors. When we call the singleton’s CreateAndJoinNetwork method, PlayFab will automatically generate a NetworkID for you that you can share with other users through various means.
private void OnNetworkJoined(object sender, string networkId)
{
Debug.Log(networkId);
NetworkID = networkId;
UI_NetworkInputField.text = networkId;
}
private void OnRemotePlayerLeft(object sender, PlayFabPlayer player)
{
Debug.Log($"{player} has left the network.");
}
private void OnRemotePlayerJoined(object sender, PlayFabPlayer player)
{
Debug.Log($"{player} has entered the network.");
var localPlayer = PlayFabMultiplayerManager.Get().LocalPlayer;
}
private void OnDataMessageReceived(object sender, PlayFabPlayer from, byte[] buffer)
{
var text = Encoding.Default.GetString(buffer);
Debug.Log(text);
}
private void OnChatMessageReceived(object sender, PlayFabPlayer from, string message, ChatMessageType type)
{
Debug.Log(message);
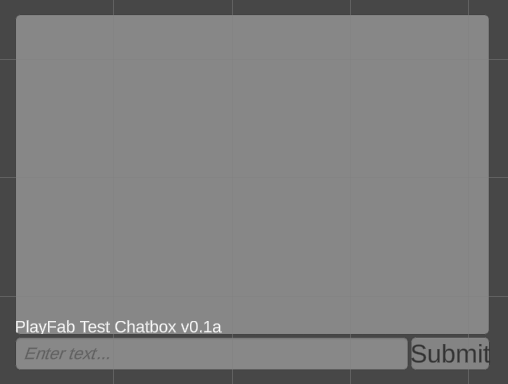
UI_ChatBox.text += ($"\n {from}: {message}");
}public void SendChatMessage()
{
string message = ($"{DisplayName}: {UI_ChatInputField.text}");
byte[] requestAsBytes = Encoding.UTF8.GetBytes(message);
PlayFabMultiplayerManager.Get().SendDataMessageToAllPlayers(requestAsBytes);
UI_ChatBox.text += ($"\n {message}");
UI_ChatInputField.text = "";
}
public void QuitApplication()
{
Application.Quit();
}
public void Login()
{
PlayFabLoginWithCustomID();
}Notes for later. PlayFabMultiplayerManager methods.
Difference between SendChatMessageAPI and SendDataMessageAPI
The primary difference between those two methods is their intended use by the recipient. A chat message is intended to be printed as a message, shown to the player. A data message is, instead, meant to be raw data transferred between clients. It won’t necessarily be displayed directly to the player and is generally used for client-to-client communication and synchronization.